
Smart Ways to Air Fry Sweet Potatoes for Better Results in 2025 Air frying has revolutionized home cooking, providing a healthier alternative to traditional frying by significantly reducing oil usage. Sweet potatoes, known for their rich flavor and nutritional benefits, are perfect candidates for air frying. Learning how to air fry sweet potatoes can lead to delicious results while maintaining their...

Effective Ways to Sell on Depop: Get Started Today! In the ever-evolving world of online resale, Depop stands out as a vibrant marketplace for fashion enthusiasts. With its user-friendly interface and community-driven approach, it’s become a go-to platform for selling unique clothing, vintage finds, and handmade items. This guide aims to equip you with practical insights on how to sell on...
Top 5 Effective Ways to Make a Degree Symbol in 2025 The degree symbol (°) serves an important role in scientific writing, weather forecasts, and everyday temperature readings. Whether you're working in Word, LaTeX, Excel, or programming, knowing how to create this symbol efficiently can enhance your documentation and communication. In this article, we'll explore various methods to type or insert...

Smart Ways to Bake a Potato in an Air Fryer for a Perfect Snack in 2025 Baking a potato in an air fryer has become an incredibly popular cooking method for its efficiency and ability to yield perfectly fluffy and crispy results. As we step into 2025, many home cooks are looking for quick and easy ways to prepare delicious snacks...

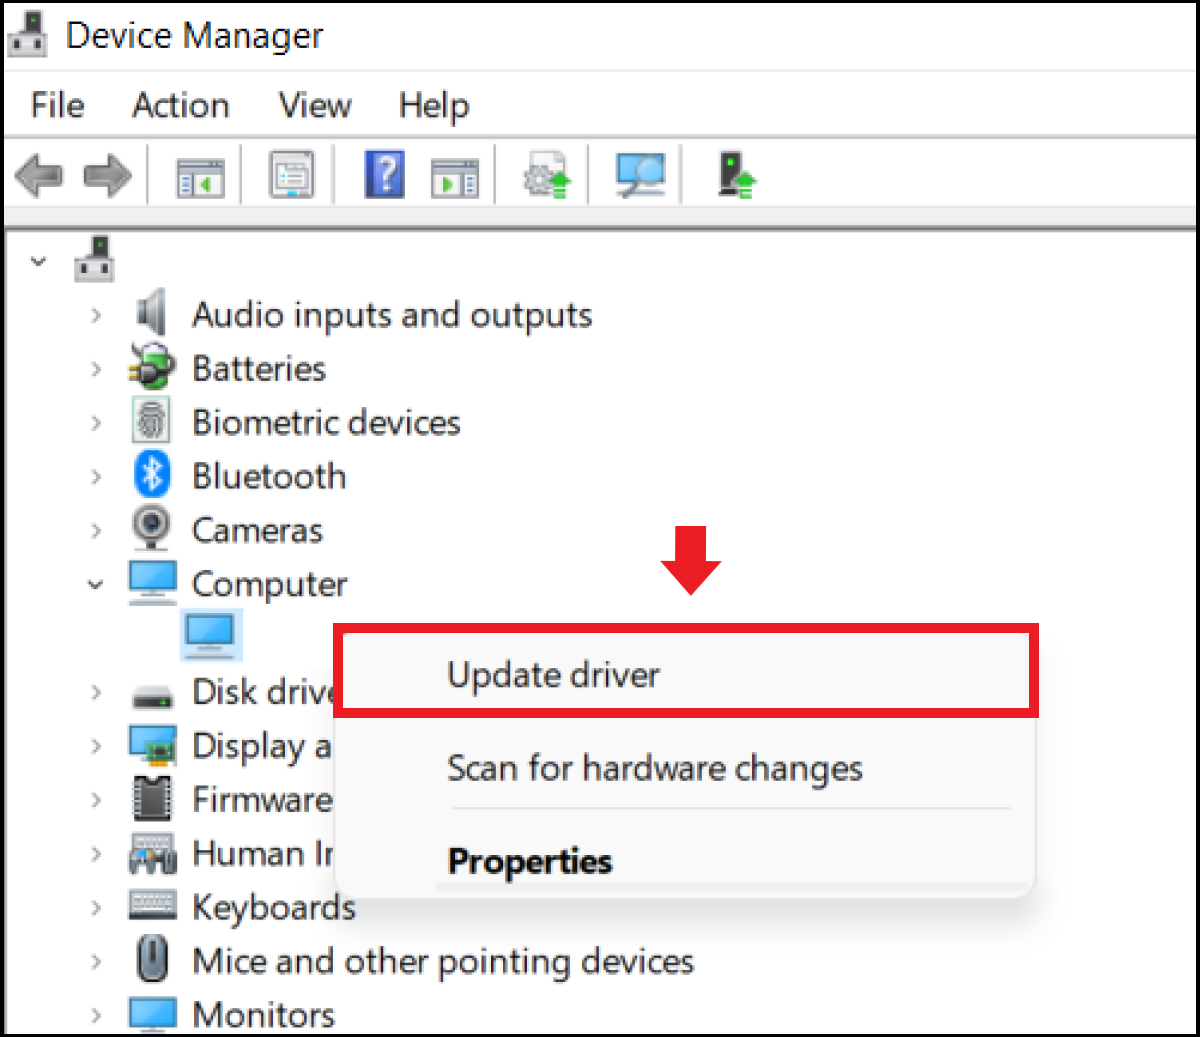
Smart Ways to Restart Your MacBook for Optimal Performance in 2025 In today's fast-paced digital world, maintaining your MacBook's performance is crucial. Restarting your MacBook regularly can significantly enhance its speed and responsiveness. As we move into 2025, understanding the different methods to reboot your device has never been more important. From the efficient MacBook restart process to troubleshooting frozen screens,...

Smart Ways to Change Your Last Name After Marriage in 2025 Changing your last name after marriage is an important decision for many newlyweds, often tied to personal identity, cultural norms, and practical considerations. The process of legally adopting a new surname can seem overwhelming, but it doesn't have to be. Understanding the requirements, implications, and tips for a smooth transition...
Smart Ways to Conduct an Interview for Better Outcomes in 2025 The landscape of job interviews is rapidly evolving, especially as we approach 2025. Companies are recognizing the need for innovative interview techniques that not only assess candidate skills but also ensure an engaging and efficient process. With the rise of technology and a diverse workforce, understanding how to conduct an...

Essential Guide to Converting Standard Form to Vertex Form Converting a quadratic equation from standard form to vertex form is a fundamental skill in algebra that enables a deeper understanding of the properties of parabolas. This transformation is particularly useful when analyzing the characteristics of quadratic functions, including identifying their maximum and minimum points, axes of symmetry, and vertex coordinates. The...

Effective Ways to Make a GIF in Photoshop Creating a GIF in Photoshop can be a fun and rewarding process. Whether you're a graphic designer or just looking to spice up your social media presence, knowing how to make a GIF in Photoshop is an essential skill. This article will delve deep into the process, providing you with tips and techniques...

Essential Guide to Getting Local Channels Without Cable in 2025 Local channels have always been the lifeblood of regional content, delivering local news, sports, and essential programming to viewers. In 2025, the shift toward cord-cutting continues, offering several ways for viewers to access local channels without the hefty price tag of cable subscriptions. Understanding how to get local channels is crucial...