How to Install Pavers: Achieve a Stunning Outdoor Space in 2025
Creating a captivating outdoor space begins with the right guidelines on how to install pavers. This guide will equip you with essential tips, techniques, and best practices for a beautiful and functional paved area, whether it’s a patio, walkway, or driveway. With a mix of practical advice and safety measures, preparing your outdoor space will be a breeze.
Paver Installation Preparation
Effective paver installation preparation is foundational to achieving lasting results. Start by assessing your desired location and consider factors such as drainage and ambient conditions. It’s crucial to determine the best layout and select the appropriate paver materials suited for your climate and needs. Researching the types of pavers available, such as concrete, brick, and natural stone, will help you decide based on aesthetic appeal and durability.
Choosing Paver Materials
The types of pavers you choose will significantly affect the visual appeal and functionality of your project. For instance, if you’re installing a driveway, look for robust options like interlocking concrete pavers that can withstand heavy loads. On the other hand, decorative stones may be suitable for garden paths. Assessing the aesthetic impact, longevity, and price is vital to making an informed choice.
Paver Base Preparation
A well-prepared base is vital for the stability of your pavers. The first step involves excavating the area to a suitable depth, generally around six to eight inches, allowing enough room for the rock base and sand. For effective drainage, ensure the base slopes away from structures. Further, using a combination of larger rocks and sand (preferably a 3/4-inch gravel base) will create a solid foundation, reducing the risk of settling later.
Tools for Installing Pavers
Having the right tools for installing pavers can make all the difference in your project’s success. Essential equipment includes a plate compactor for leveling your base, a level for balancing your pavers, and a rubber mallet for setting them into place without breakage. Don’t forget a concrete saw or paver splitter for cutting any pavers to fit your layout. Equipping yourself properly will lead to a smoother installation process.
With proper preparation complete, you can now transition to the installation phase of your pavers where the real transformation begins.
Steps to Install Pavers
Following structured steps will ensure a successful DIY paver installation experience. Each step should be approached with care, allowing for adjustments to your conditions as necessary. Whether you’re laying a simple pathway or an intricate patio, adhering to these steps will yield impressive results.
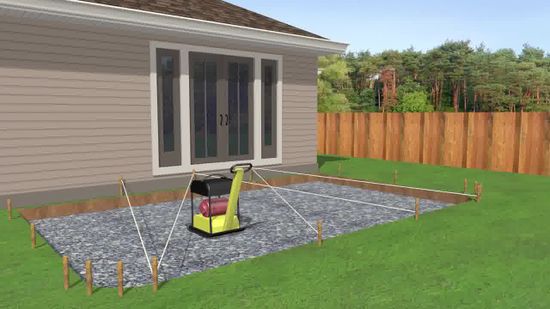
Paver Layout Design
Before laying down pavers, it’s essential to create a detailed paver layout design. Mark your outlines using stakes and string to visualize the shape and determine if the layout works as intended. Incorporate patterns, such as herringbone or basketweave, to enhance aesthetic appeal while ensuring practicality. Trial-and-error during this stage can save a lot of time and materials in the long run.
Leveling Paver Surface
After creating your base, ensuring the leveling of the paver surface is crucial. Begin by spreading a layer of sand (approximately one inch thick) over your compacted base. Instead of rigidly laying the pavers down, use a screed board to achieve an even sand surface. Once the sand is leveled, you can begin laying the pavers according to your marked design. Adjust the pavers as necessary to ensure a pleasing fit throughout.
Paver Edging Installation
To keep your stones in place, effective paver edging installation is necessary. Edging helps to prevent shifting and ensures that your established pattern remains intact. Various options are available, such as plastic, aluminum, or concrete edging. Secure the edging into place before filling joints and adding jointing sand for a complete look.
After installing the pavers, it’s crucial to focus on finishing touches and maintenance to prolong the life of your attractive outdoor features.
Maintaining Pavers
Regular maintenance of pavers is key to preserving their beauty and functionality. Establishing a care routine will prevent issues and prolong the life of your installation. Here are some effective strategies to maintain your pavers.
Proper Jointing Sand for Pavers
Using the right jointing sand for pavers is crucial in preventing weed growth and insect infestations. After the pavers are laid, spread polymeric sand over the surface, allowing it to fill gaps between the stones. Once you’ve ensured the gaps are filled, lightly spray with water to activate the polymer and create a sturdy bond. This not only enhances aesthetics but also reduces maintenance over time.
Sealing Pavers
Applying a sealant to your pavers maintains their color and shields them from elements like oil stains and harsh weather. Most sealants are easy to apply and can be done after allowing the joint sand to settle fully. Typically, wait 24-48 hours after installation before sealing. Rinse pavers thoroughly and apply your sealant evenly, allowing adequate drying time based on product guidelines for optimal results.
Winterizing Pavers
With winter approaching, winterizing your pavers protects them from harsh conditions. This involves cleaning any debris and preventing the buildup of snow and ice. Consider using a snow blower, as traditional shoveling can scratch the surface. Additionally, applying a winter sealant can further aid in protecting your investment against freeze-thaw cycles.
Conclusion
In conclusion, learning how to install pavers correctly ensures an exquisite outdoor space that enhances your home’s functionality and aesthetic appeal. By following the outlined steps in this guide and committing to regular maintenance practices, you’ll enjoy a stunning landscape that can withstand the test of time. Achieve your outdoor vision with the proper knowledge and resources, and elevate your space today!
FAQ
1. What are common mistakes in paver installation?
Some common paver installation mistakes include inadequate base preparation, failing to account for drainage, and improper cutting of pavers. Ensuring that each step is completed carefully will help to mitigate these issues. Regularly check your work against outlined guidelines and don’t hesitate to ask for expert advice for complex layouts.
2. How much does paver installation cost?
The cost of paver installation varies significantly based on factors such as materials, size of the area, and complexity of design. Typically, expect costs to range from $10 to $25 per square foot. Discuss thoroughly with your installer regarding your needs and budget before commencing.
3. Can I install pavers over concrete?
Yes, paver installation without concrete can be achieved though it requires different techniques. If installing over existing concrete, focus on ensuring the surface is smooth and level to lay the new paver foundation securely. Advanced approaches may include using a flexible base layer for increased stability.
4. What types of pavers work best for driveways?
For driveways, best pavers for driveway applications include thick and durable materials like concrete or brick pavers. Many homeowners opt for interlocking systems that provide added structural strength suitable for vehicle traffic while maintaining a stylish look.
5. How often should pavers be sealed?
It’s recommended to apply a fresh coat of sealant every 1-3 years, depending on usage and weather conditions. This keeps your landscaping with pavers vibrant and provides a protective barrier against the elements and unsightly stains. Be sure to review the specific manufacturer’s instructions for optimal results.

