Smart Guide to Setting Up Your New iPhone in 2025
Welcome to the ultimate guide on how to set up your new iPhone in 2025! Whether you are unfamiliar with iPhones or just upgrading to the latest model, this comprehensive iPhone setup guide will walk you through key steps to ensure a seamless and effective installation. From activating your iPhone to customizing your device, we will cover vital tips and tricks to make your experience enjoyable and user-friendly.
Getting Started with Your iPhone
Before diving into the detailed iPhone installation steps, it’s essential to gather the necessary materials. Ensure that you have your new iPhone, a reliable Wi-Fi connection, and your Apple ID ready. Starting with these elements makes the process smooth and efficient. In this section, we will explore how to activate your iPhone, connect to Wi-Fi, and set up your Apple ID.
How to Activate Your iPhone
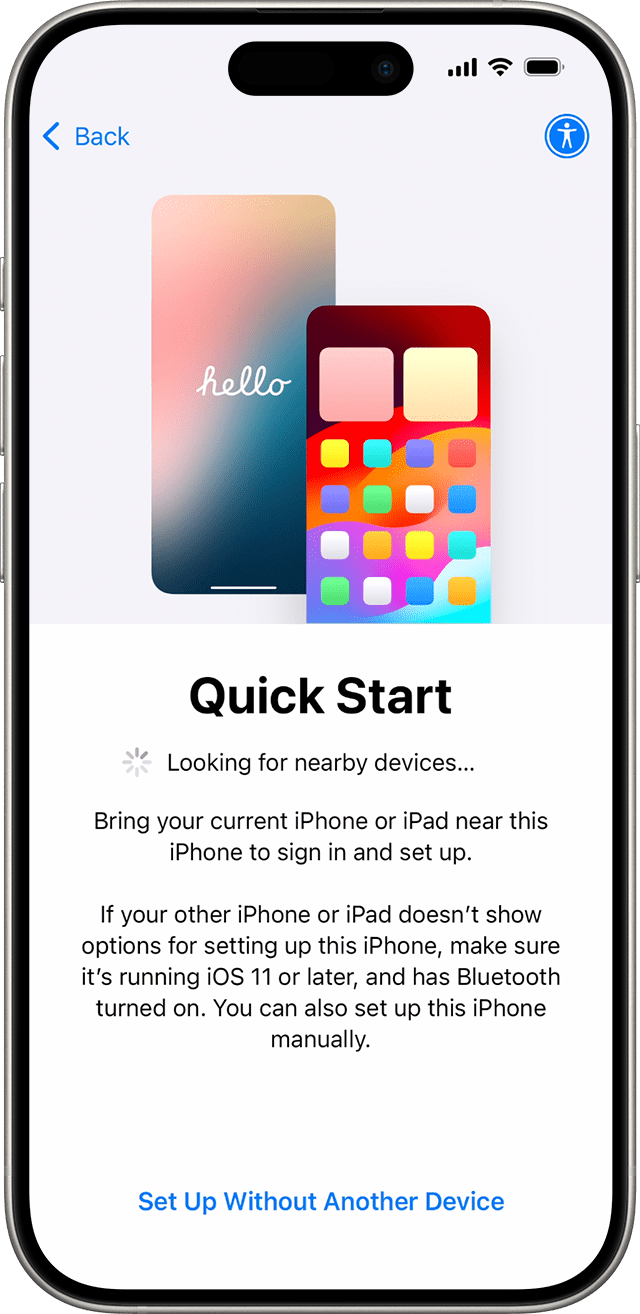
Activating your new iPhone is a straightforward process that gets you up and running. Turn on your iPhone by pressing and holding the side button until the Apple logo appears. Follow the on-screen instructions, which will guide you to select your language and region. When prompted to activate your iPhone, you can do so via Wi-Fi or cellular network. If you have a SIM card, insert it now; otherwise, you can continue using Wi-Fi for activation. After activation, you’ll be able to configure iPhone settings to suit your preference.
Connect Your iPhone to Wi-Fi
One of the initial tasks during your iPhone setup is to connect to Wi-Fi. Wi-Fi connection is crucial for activating your phone, downloading updates, and installing apps. To connect your iPhone to Wi-Fi, navigate to the Wi-Fi settings in the setup menu. Select your desired network from the list and enter the password if prompted. A stable connection can enhance your iPhone experience, allowing for faster downloads and smoother functionality.
Set Up Your Apple ID
Creating an Apple ID is a crucial step in personalizing your iPhone. This ID allows access to Apple services, including the App Store and iCloud. In the setup process, you’ll see the option to create a new Apple ID or use an existing one. If you’re a new user, select “Create Apple ID” and follow the prompts to input details like your name, email, and password. Remember, securing your Apple ID with a strong password not only makes it unique but also enhances your iPhone security settings.
Transferring Data to Your New iPhone
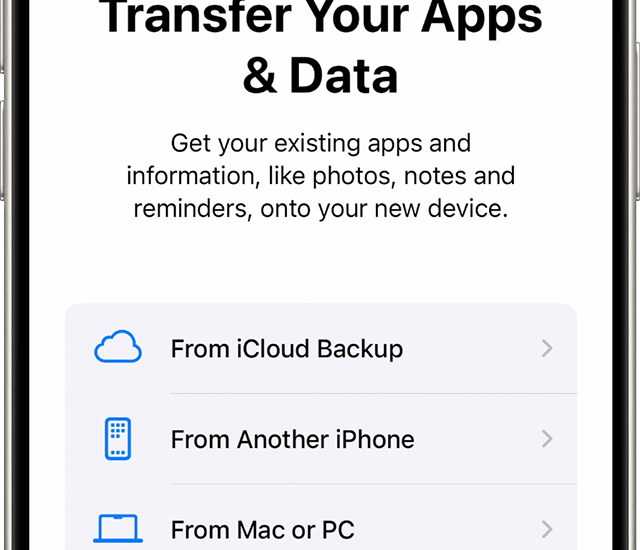
Once your iPhone is activated and your Apple ID has been set up, the next step is to transfer data to your new iPhone. This can include contacts, photos, and apps from your old device. Apple provides several methods to make this transition easy, emphasizing a seamless user experience.
Transfer Data from Another iPhone
If you’re upgrading from an old iPhone, you’ll find the transfer process simple with the iPhone quick setup. Place your new iPhone near your old device, and a prompt will appear on your old device to start the data transfer. Follow the on-screen instructions, which may involve scanning a code displayed on your new iPhone. Keep your devices plugged in during the transfer process to prevent any interruptions.
Transferring Data from Android to iPhone
Transferring your data from an Android device to a new iPhone is equally manageable using the “Move to iOS” app. Download the app on your Android phone, connect both devices to Wi-Fi, and follow the instructions analyzed in the app. This feature allows for smooth migration of your contacts, message history, photos, and more. Once the transfer completes, your iPhone is ready for more personalization.
Restoring iPhone from Backup
If you previously backed up your data on iCloud or your computer, restoring your new iPhone from a backup is a practical option. During setup, you’ll find the option to restore from iCloud or iTunes. Select the appropriate backup, log in, and wait for the process to complete. Always ensure you have the latest backup to restore your files accurately and effectively.
Personalizing Your iPhone Settings
After the data transfer is complete, it’s time to configure your iPhone settings for optimal usage. These settings encompass security, notifications, app management, and more, all to help you tailor your iPhone experience to your preferences.
Manage Your Notifications Settings
Your iPhone will generate notifications from multiple applications, which can sometimes become overwhelming. To manage notifications, go into Settings and select Notifications. Here you can customize how each app communicates with you, whether through sound, banners, or no alerts at all. Configuring notifications can reduce distractions and help you focus on what’s important.
Security Settings for Your iPhone
Prioritize your privacy with the iPhone security settings. Enable Face ID or Touch ID to safeguard your data. Additionally, activating the Find My iPhone feature can help recover your phone if it goes missing. These essential settings protect your data and enhance the overall safety of your device.
Customize Your iPhone Display
Next, personalize your iPhone’s appearance. Navigate to Display & Brightness under settings to adjust text size, display options, and brightness according to your comfort. Furthermore, you can customize your home screen by organizing apps into folders or using the App Library feature for better accessibility. Setting up widgets on your home screen can also provide quick access to your most-used applications.
Optimizing Your iPhone Usage
In this final section, we’ll cover how to maximize your iPhone’s capabilities, including enabling important features such as Apple Pay, backup settings, and battery management, ensuring your device runs smoothly throughout its lifespan.
Setting Up Apple Pay on Your iPhone
Using Apple Pay simplifies transactions and streamlines your shopping experience. To set up Apple Pay, navigate to Wallet & Apple Pay in the Settings app. You can then add your credit or debit card by following on-screen instructions for quick payments at stores or online. Enabling Apple Pay brings convenience and ease to your purchasing experience while shopping.
Backup Your iPhone Data
Regularly backing up your data is critical for preventing data loss. To backup your iPhone, go to iCloud settings, select ‘Backup,’ and ensure automatic backups are turned on. Regular backups keep your documents, photos, and settings safe. You can also periodically connect your iPhone to your computer to backup using iTunes, further securing your data with alternative storage.
iPhone Battery Management Tips
Lastly, ensure the longevity of your iPhone’s battery through effective management. Go to Settings and select Battery to monitor your battery usage. Enable Low Power Mode when necessary to save battery during critical times. Unwanted performance can result from background app activity, so checking these settings regularly can improve your battery life and optimize performance.
Key Takeaways
- Follow the structured steps to set up your iPhone effectively.
- Prioritize personal security settings like Apple ID and data transfers.
- Optimize iPhone usage with effective battery management and Apple Pay.
- Customize notifications and home screen for improved user experience.
- Regular backups keep your data secure and accessible.
FAQ
1. How do I troubleshoot iPhone setup issues?
If you encounter any setup problems, restart your iPhone and check the Wi-Fi connection. Ensure you are following the installation steps correctly. For persistent issues, consult the Apple customer support or community forums for assistance tailored to troubleshooting common iPhone setup problems.
2. What should I do if I forgot my Apple ID password?
You can reset your Apple ID password by navigating to the Apple ID account page. Follow the instructions provided for resetting your password through your registered email or security questions. If issues arise, connecting with Apple support assistance will be helpful.
3. Can I set up my iPhone without a SIM card?
Yes, it’s possible to complete the setup process without a SIM card using Wi-Fi. Simply choose to skip the cellular setup initially, and you can use the iPhone functions with available apps and services. Remember, having a SIM is necessary later for making calls and using mobile data.
4. How frequently should I back up my iPhone?
Ideally, you should back up your iPhone regularly, preferably after significant changes or updates. Automating backups through iCloud settings ensures that your data is secured consistently without manual interventions.
5. How can I enable Do Not Disturb on my iPhone?
To enable Do Not Disturb, go to Settings and select Do Not Disturb. You can customize it to activate automatically during specific hours, blocking notifications and calls while you focus on tasks. This feature enhances concentration, especially during busy periods.