Practical Ways to Dutch Braid Your Own Hair for a Stylish Look in 2025
Understanding the Dutch Braid Technique
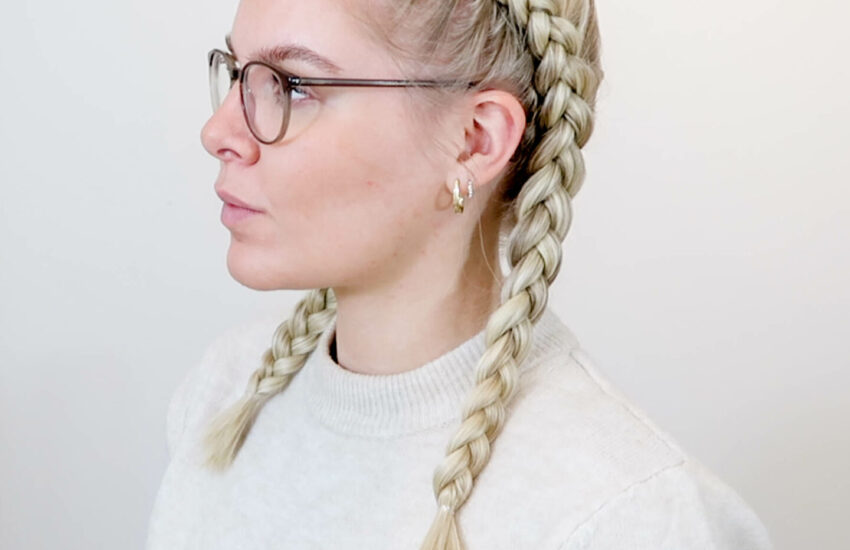
The **dutch braid** is an elegant and versatile hairstyle that can elevate any look, whether it’s for a casual day out or a special occasion. This technique is often described as an inverted version of the classic french braid, resulting in a distinctive raised pattern. Embracing various *dutch braid styles* allows you to express your personality and creativity through your hair. In this section, we will discuss the foundational elements of mastering the *dutch braid technique*, particularly focusing on how to properly section hair and manage different hair types.
Hair Sectioning for a Smooth Dutch Braid
Before you dive into the *step by step dutch braid*, it’s critical to know how to section your hair properly. Begin by untangling your hair using a reliable detangler. Once your hair is smooth, create a center or side part based on your preference, which will set the stage for the *dutch braid hairstyle*. Divide your hair into three equal sections: left, middle, and right. To achieve that perfect braid, remember to keep the sections taut. This ensures a neat appearance and helps avoid the common braiding mistakes that beginners often face. With each subsequent braid, instead of crossing over as you would in a regular braid, this technique requires you to cross sections under, providing that classic inverted look. Practice makes perfect, so don’t hesitate to run through this process multiple times until you’re comfortable.
Hair Types and Their Impact on Braiding
Different hair types react uniquely to braiding. For *long hair dutch braid*, those with thick hair often find that their braids look fuller, whereas fine hair can sometimes require a little more expertise in terms of volume management. For those with curly or textured hair, pre-braiding hair care becomes crucial, as moisture can lead to a frizz-free finish. One tip is to apply a light leave-in conditioner before braiding to keep hair smooth. Additionally, using *hair ties for braiding* that match your hair color can enhance the look, making the braid appear seamless. Tailoring your approach depending on your specific hair texture will explore new styles and increase the potential for flawless braid execution.
Step-by-Step Dutch Braid Tutorial
Now that you understand the baseline for looking into the dutch braid technique, it’s time to delve into a straightforward *dutch braid tutorial*. This everyday braid looks stunning and can be a fun project. Below is a simplified walkthrough that guarantees success, whether you’re a beginner or more experienced.
Step 1: Preparation and Tools
Before beginning, gather all necessary tools. You will need hair ties, a comb for sectioning, and optional hair accessories, such as ribbons or decorative pins for added flair. Ensure your hair is clean and dry. If you want more volume in your braid, you can use a volumizing spray to achieve that perfect poofy look that enhances the styling process.
Step 2: Create the Base of Your Dutch Braid
After parting your hair, follow the initial sectioning techniques mentioned earlier. Start by taking the right section and crossing it underneath the middle section towards the left, then repeat this with the left section. As you continue, gradually incorporate more hair into each section from the side you are braiding on. This incorporation is critical in maintaining that… noticeable dutch braid look. Focus on keeping even pressure and tightness; the more controlled your movements, the cleaner your final appearance will be.
Step 3: Finish and Secure Your Braid
Once you’ve reached the desired braid length—hold tight at the end, and secure the braid with a hair tie. For added security, consider using a small elastic with a matching color. For a *messy dutch braid*, gently tug on sections of the braid to loosen them up. This not only adds texture but also gives an effortless vibe that’s stylishly chic. With practice, you will find ways to customize your look. Transitioning from this basic structure allows for various *dutch braid hairstyles* as well as intricate variations. Experimenting is encouraged on your styling journey!
Exploring Dutch Braid Variations
While mastering the classic dutch braid is essential, exploring numerous variations can really showcase your styling skills. Consider your daily activities and select the braid type that complements your outfit and events perfectly.
Types of Dutch Braids
Some of the most popular styles include the *two dutch braids*, which frame your face beautifully and are practical for workouts. For a look that’s a bit more sophisticated, try the *dutch braid crown*, dazzling for weddings and special occasions. You can even twist classic styles with creative ideas, such as a *waterfall dutch braid* or a *dutch fishtail braid* that adds an artistic flair to competitions or formal events. Surprisingly, all these variations stay true to the inverted style while offering something unique for each occasion.
Add Accessories for Individual Style
Embellishing your dutch braid with different accessories, from beads to decorative pins or even fun hair ribbons, can turn a standard braid into a statement piece perfect for events. Explore cultural influences in braiding; many communities adorn their *dutch braid accessories*, showcasing textures and spins that connect to identity. Being mindful of incorporating these unique accessories could double as a conversation starter, making your hairstyle truly innovative.
Experimenting With Dutch Braid Techniques
Don’t hesitate to mix braiding methods! The *french twist dutch braid* helps with securing your hair in tighter styles, while combining a dutch braid with more modern looks creates a *braid hairstyles for kids* that exemplifies finesse. Tutorials available online and attending hair braiding events or workshops allow you to learn from masters of braiding, and some virtual classes help you connect with fellow braiders to expand your skill set. Discover new ideas and community support as you enter the world of creative braiding.
Maintenance and Care for Your Dutch Braid
After styling your hair, it’s essential to maintain it, prolonging the beautiful braids that you’ve crafted. Knowing *how to keep a dutch braid neat* throughout the day will save you from frequent retouches and keep everything intact.
Making Your Braid Last
To enhance the longevity of your braid, applying an anti-frizz serum or a light spray can protect it from environmental stressors that lead to wear. On a regular *braid maintenance tips* front, cleanly securing hair sections with durable elastics will keep everything in place. Some find they need more frequent touch-ups if they’re active, while others enjoy their braids’ style for several days. Go with the route that suits your lifestyle and demands while maximizing that fresh look.
Refreshing Your Braid
If you notice your *dutch braid* loosening, consider some quick fixes such as lightly re-twisting tighter sections or securing loose strands with a bobby pin. When you desire a more casual or refreshing look, opting for a *messy dutch braid* allows for an easy refresh that’s still on-trend. At times you can pull out small sections to frame your face to create a softer look. Being nimble with fashion trends is essential, especially as styles shift towards more relaxed and whimsical vibes.
Key Takeaways
- Mastering the *dutch braid technique* lays the foundation for numerous stylish looks.
- Proper hair care and section management can vastly improve your braiding experience.
- Experimentation with styles and accessories can elevate your dutch braid to new heights.
- Ongoing maintenance plays a critical role in preserving the look and longevity of your braid.
- Online resources and communities provide excellent support and inspiration for all skill levels.
FAQ
1. What hair types are best suited for a dutch braid?
While most hair types can adapt to a *dutch braid*, those with thicker or longer hair tend to have the best results. Fine or thinner hair can benefit from (*pre-braiding hair care*) products to add volume and texture before starting. Curly textures also work well with braiding, particularly when damp, which helps in control and reduces frizz.
2. How long can I expect a dutch braid to last?
The longevity of your *dutch braid* depends on activity level and hair health, but they can often endure between 1 to 3 days with proper care. Incorporating *how to keep a dutch braid neat* and using quality accessories can aid in maintaining a lasting appearance.
3. What are some tips for beginners learning to braid?
Start with simple *diy dutch braid* practices, focusing on mastering the sectioning technique. Begin by creating loose tension to prevent the hair from snapping and gradually build confidence as you practice. Watching online tutorials can also enhance understanding, presenting visual techniques that translate well into practical exercises.
4. Can I use hair products with my dutch braid?
Absolutely! Integrating *hair products for dutch braid* like serum for shine and anti-frizz sprays can both protect and enhance the braid’s appearance. Look for lightweight products to avoid weight or stiffness, allowing for a natural, flowing look.
5. How can I combine different types of braids?
Combining various braid styles can be exciting! For example, mixing a *fishtail braid* with a *dutch braid* creates a visually stunning effect. Experimenting helps develop your unique style; don’t be shy about seeking inspiration from social media or local events showcasing creative braiding.