Effective Ways to Patch a Large Hole in Drywall
Understanding Large Hole Drywall Repair
Patching drywall is an essential skill for any homeowner or DIY enthusiast. When dealing with a large hole in drywall, it’s important to deploy the right drywall patch techniques. This process not only restores the appearance of the wall but also maintains the structural integrity of drywall. Large holes can result from various factors such as plumbing issues, accidental impacts, or even age. When assessing wall damage, it is crucial to evaluate the surrounding area to determine the best approach. This article will guide you through the necessary steps to effectively fix drywall holes, discuss the tools you need for drywall repair, and trickle in some crucial safety precautions to keep in mind. By following this comprehensive guide, you’ll master how to patch drywall like a pro!
Assessing Wall Damage
Before starting any DIY drywall repair, you must first assess the extent of the wall damage. This step is crucial because the size of the hole dictates the repair materials and techniques you will need. In general, holes larger than 1 inch should be treated as large repairs, requiring more intricate techniques like constructing a backerboard from scrap wood or a drywall repair patch. Use a ruler or measuring tape to take accurate measurements of the hole—you want to ensure your drywall patch size is just right. Once you have carefully assessed the damage, gather the appropriate patching materials and tools for the job. Understanding different wall hole types will also guide your approach throughout the repair process.
Choosing the Right Drywall Patch
Choosing the right drywall patch is one of the most critical steps in repairing drywall seams. For large holes, you typically have two options: pre-made patches and custom-made patches. Pre-made kits often include mesh tape or self-adhesive patch panels that simplify the installation process. When creating a custom patch, ensure that the drywall piece fits snugly into the hole. Additionally, don’t forget to consider the types of joint tapes used during the repair. Mesh tape tends to be more forgiving, while paper tape provides a smoother finish, but each serves a unique purpose in ensuring the patch smoothly blends with your wall.
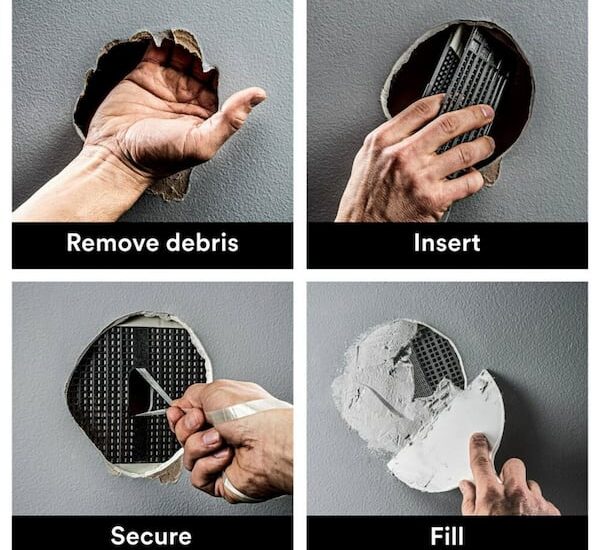
Techniques for Patching Drywall Holes
Once you’ve assessed the damage and chosen your patch, it’s time to dive into **drywall patching techniques**. Mastery of the different drywall finishing techniques will elevate the overall appearance of the repaired area. Typically, the process involves three key steps: attaching the patch, applying joint compound, and sanding the surface. It’s advisable to start with a clean workspace for drywall repair to minimize potential complications.
Installing a Drywall Patch
When installing a drywall patch, first prepare the area surrounding the hole. Trim any ragged edges to create a smooth surface for adhesion. If you’re using a custom patch, apply a layer of adhesive directly to the back of the patch. Secure it firmly in place, ensuring it is flush with the wall surface. For larger repairs, it’s common to use a few screws to hold the patch. Drill small holes for the screws, and then use them to attach the patch securely. Remember, ensuring a secure fit is essential in preserving the structural integrity of drywall, especially in areas subject to movement or stress.
Applying Joint Compound
After installing your drywall patch, the next step is to apply joint compound. Use a broad putty knife to spread a generous amount evenly over the patch and surrounding areas. A smooth application will help achieve a seamless drywall repair. Allow the first coat to dry thoroughly before applying additional coats if necessary. The number of coats you apply may depend on how well the surface dries and the desired finish. Once you’ve achieved the required smoothness, **sanding techniques for drywall** become essential to acquire a flawless, finished look.
Finishing Touches for Seamless Drywall Repair
The finishing touches in drywall repair are often what differentiates professional work from DIY jobs. After ensuring your patched area is properly primed, it’s important to match the existing wall texture. Even if the texture is minimal, it can make a noticeable difference in the visibility of the patch. If the surrounding wall has texture, consider adding a texture match during the last phase of the repair.
Drywall Texture Matching
To achieve effective wall maintenance, your **drywall texture matching** needs to be spot on. If your wall is painted with a specific texture, such as knockdown or orange peel, use a spray can or a texture-based solution that replicates the surrounding finish. The best technique is often to practice on a scrap piece of drywall to ensure consistency. If you get it slightly wrong, don’t stress about it—more joint compound can still mask minor inconsistencies before the painting begins.
Painting Drywall After Repair
Once the joint compound dries and is finely sanded, it’s time to paint the area to make it look new again. When selecting a primer and paint, consider the original wall’s characteristics and color. The finish type of paint can also make a difference in the final appearance. Apply one to two coats of primer before painting your desired color, ensuring to apply light, even strokes. Lastly, adjacent areas should be blended in for the most realistic results. Proper painting techniques will safeguard against issues like cracking in drywall.
Maintaining Your Drywall Properly
Once your drywall patch is successfully completed, it’s wise to understand regular maintenance to ensure longevity. The integrity of drywall extends beyond the repair itself; understanding common drywall issues and being proactive is key for longevity and performance.
Preventing Cracking in Drywall
One common concern post-repair is cracks reemerging. A few preventative maintenance tips include monitoring indoor humidity levels and addressing leaks immediately. Apply ideal wall care strategies such as sealing around edges. Keeping your drywall maintained can extend the time between repairs significantly while retaining the aesthetics of your interiors.
Common Drywall Issues and Solutions
Understanding the various types of drywall damage can prepare you for additional repairs in the future. For example, watch for moisture damage in bathrooms or kitchens that could cause mold if not addressed immediately. Teach yourself the basics of drywall principles to distinguish between minor surface issues and substantial damage that may require professional assessment. Having the right tools and knowledge will empower you to handle most common drywall mistakes without external help.
Key Takeaways
- Assess the overall wall damage before selecting patch materials.
- Employ the right techniques for attaching and finishing drywall patches.
- Regular maintenance and understanding of drywall properties can prolong its life.
- Texture matching and primer application are crucial for a seamless repair.
- Stay knowledgeable about common drywall issues to better prepare for potential repairs.
FAQ
1. What are the best tools for drywall repair?
To effectively repair drywall, you’d need essential tools such as a putty knife, drywall saw, measuring tape, level, and a drill for installing drywall patches. A drywall patching kit can simplify the process, making it easier to tackle common damage.
2. How do I prevent cracks in my patched drywall?
Preventing cracking in drywall can be achieved by ensuring proper installation techniques and adequate drying time for the joint compound. Additionally, maintaining consistent humidity levels in your home can help minimize wall surface stress.
3. When should I consider professional drywall repair services?
If the damage is extensive, such as structural issues that compromise wall integrity, it’s typically best to enlist professional drywall repair services. Hiring experts ensures an appropriate assessment and a seamless fix without compromising your walls.
4. Can I patch drywall holes without noticeable repairs?
Yes! If you follow the correct drywall finishing techniques, including proper sanding and texture matching, you can achieve a flawless result that blends with your existing wall. This will effectively hide your repairs from plain sight.
5. What type of primer should I use on patched drywall?
Using a high-quality, water-based primer is recommended for patched drywall. This type of primer aids in sealing the joint compound and improving paint adhesion, leading to a more uniform finish when the topcoat is applied.
6. What maintenance routine should I establish for my drywall?
To maintain your drywall, regularly inspect it for damage, ensure proper humidity levels, and immediately address any leaks or moisture issues. Dusting and cleaning the wall surfaces will also keep them looking fresh and can prevent long-term technical issues.
7. What’s the role of sandpaper in drywall repair?
Sandpaper plays a vital role in achieving a smooth finish for patched drywalls. Using the right grade of sandpaper can help eliminate roughness and create an even surface, making the wall ready for painting. Practice light sanding for precision and care.